LSU4.9 O2 UEGO Wideband Oxygen Sensor for 11-15 Pontiac G3 Chevrolet Aveo5
Product categories
- ATV Accessories (126)
- ATV Parts (3672)
- ATV UTV Parts (1614)
- Accessories (190)
- Air&Oil Filters (3)
- Axles (775)
- Bearings (9)
- Body (67)
- Brakes (37)
- Bushings (44)
- Cable (1)
- Chain (9)
- Drive Belt (1)
- Drive Clutch (266)
- Clutch Accessories (258)
- Clutch Kits (8)
- Engine (19)
- Gear box or reverse gear (1)
- Handlebars (2)
- Ignition Coil (2)
- Pinion Shaft (1)
- Rectifier/Regulator (1)
- Seats & Covers (2)
- Solenoid (1)
- Starter (4)
- Switch (1)
- Tools (3)
- Winches & Mounts (10)
- ATV??? (39)
- Bars & More (94)
- Bicycle Parts (6)
- Bumpers (94)
- Car Parts (3911)
- Clutch Accessories (9)
- Clutch Kits (23)
- Drive Clutch (11)
- Driven Clutch (1)
- Go Kart Parts (33)
- Golf Cart Parts (6266)
- Accessories (1454)
- Air Filter (13)
- Askets & Roof Racks (2)
- Axles (34)
- Battery Charger (82)
- Bearings (33)
- Belt (666)
- Brush Guards (94)
- Bushing (100)
- Cable (1)
- Carburetor (46)
- Cargo Boxes (4)
- Custom Body Kits (1)
- Dash Kits (9)
- Diamond Plate Accessories (18)
- DISC BRAKE SYSTEMS (156)
- Drive Clutch (444)
- Clutch Accessories (62)
- Clutch Kits (156)
- Drive Clutch (108)
- Driven Clutch (90)
- ELECTRIC PERFORMANCE PARTS (154)
- Enclosures (32)
- Fans & Blowers (2)
- Fender (37)
- Floor Mats (31)
- Gas Performance Parts (11)
- Gear (14)
- Heaters (2)
- Horns (17)
- Ignition Coil (76)
- Lift Kits (206)
- Light Kits (164)
- Mirrors (31)
- Rear Seats (144)
- Seat Belts (768)
- Seat Covers & Replacement Seats (1)
- Shock Absorber (25)
- Solenoid (36)
- Speed Sensor (13)
- Starter Motor (43)
- Steering Wheels (60)
- Storage Covers (46)
- Tools (7)
- Tops and Roof Supports (13)
- Tuned Exhausts (404)
- Wheel Covers (10)
- Wheels and Tires and rim (641)
- Windshields (33)
- Jet Ski Accessories (1)
- Lawn mower accessories (7)
- Lawn Mower Parts (898)
- Minibike Parts (11)
- Motorboat Parts (11)
- Motorcycle Accessories (17)
- Motorcycle Parts (2537)
- Mower & Tractor parts (1027)
- Other Parts (197)
- Others (18)
- Scooter Parts (78)
- Snowmobile accessories (1)
- Snowmobile Parts (406)
- Snowmobiles Parts (20)
- Tarctor Parts (137)
- Tracor Parts (23)
- Tractor Accessories (11)
- Tractor Parts (533)
- Uncategorized (5)
- UTV Accessories (48)
- UTV Drive Clutch (45)
- UTV Parts (1412)
- UTV??? (39)
Product tags

")
")
")
")
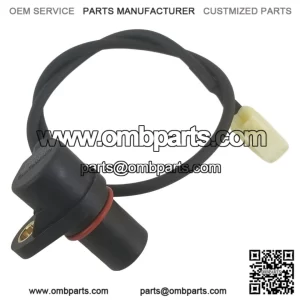
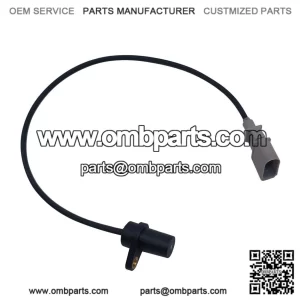
LSU4.9 O2 UEGO Wideband Oxygen Sensor for 11-15 Pontiac G3 Chevrolet Aveo5
LSU4.9 O2 UEGO Wideband Oxygen Sensor for 11-15 Pontiac G3 Chevrolet Aveo5
Please check fitment notes & description for accurate information. Part Number: 0258017025Design: Wideband UEGO LSU4.9 O2 SensorFeature: Compatible with all fuel types: leaded, unleaded, diesel, methanol, E85, AVgas, Ethanol Long Lasting 100% Exact Replacement 0-5v O2 Sensor Direct plug in replacement for Innovate devices and Others, no modifications neededfor Other part number: AEM # 30-2004 Autometer # 2243 FAST # 170408 Dynojet Wideband Commander # 48292001 GM # 12575657 AC Delco # 213-1572 PLX Devices # Type B Motec # 57005 Oxygen Sensor’s Location: How do I know the O2 sensor is good or not
Check engine light on
A reduction in fuel economy.
Your catalytic converter fails unexpectedly
Exhaust emissions reach undesirable levels.
How to install the oxygen sensor Step 1 – Some sensors are equipped with a heat shield that must be removed before the sensor removal, this is performed by removing any mounting bolts. Step 2 – By using a regular socket it minimizes potential damage to the sensor body and the threads, this technique helps avoid stripping the old sensor upon removal. Step 3 – Then, locate and disconnect the wiring connector, this step should be done before removing the sensor if the wiring is still attached. Step 4 – Its important that the wiring harness connectors are exactly the same, each sensor is unique to it’s position and is located in the system by its connector configuration. (Note: some replacement sensors have a universal electrical connector that must be configured to the wiring of the old sensor.) Step 5 – Use a small wire brush to help clean the threaded port to ensure a proper seal of the new sensor. Gently install the new oxygen sensor by hand while keeping the wiring and connector free from bends. Step 6 – Gently tighten the sensor while keeping wiring free from damage, these sensors need to be fairly snug to avoid leakage. Step 7 – Once the sensor is tightened, reinstall any heat shields or bracing that had to be removed. Step 8 – After the heat shield has been reinstalled, mount the connector to it’s holder and reattach the connector back onto the wiring harness. If the car has diagnostic trouble codes, they will need to be cleared. Must Know Before Buying: The following information is for instructional and guidance reference only. We try and make them as accurate as we can. If Check Engine Light is on or an OBDII Trouble/Fault code occurs after installation, check the sensor with a voltmeter as below.
If the sensor is good, further diagnosis is required. There’re many different codes for specific functional failures, which are NOT necessarily relevant to the sensor. Find out what the Code means before leaving any feedbacks. Items that have been installed, altered or contaminated are non-returnable. 1. ONLY a defective sensor after tested by a voltmeter is applied to manufacturer warranty.
2. 20% restocking fee is required if buyer bought wrong items due to not paying attention to fitment information and ask for return. The Price, Quality & Functionality of the O2 Sensor is fully covered under our warranty & return policy. However, refund for any labor cost, expense in a dealer shop or damage due to wrong installation is NOT covered.
Related products
-

-
 ATV Parts
Speed sensor CFMOTO 800 1000 7020-150400
-
 ATV Parts
Crankshaft sensor ODES 800 21040110901
-